
| 일 | 월 | 화 | 수 | 목 | 금 | 토 |
|---|---|---|---|---|---|---|
| 1 | 2 | 3 | 4 | 5 | 6 | |
| 7 | 8 | 9 | 10 | 11 | 12 | 13 |
| 14 | 15 | 16 | 17 | 18 | 19 | 20 |
| 21 | 22 | 23 | 24 | 25 | 26 | 27 |
| 28 | 29 | 30 | 31 |
- 유니티 대화
- 크래프톤 정글 게임 랩
- 오픽 im1
- Unity 독학
- 크래프톤
- 게임 개발
- 게임 개발 독학
- 유니티
- protobuf란
- unity 게임
- 유니티 퀘스트
- 크래프톤 정글랩
- node.js
- unity 강의
- ETRI 연구연수
- 오픽 im1 5일
- 유니티 독학
- Unity Chess
- unity 설치
- unity 공부
- 크래프톤 정글 게임랩
- 크래프톤 게임 정글 랩
- protobuf 란?
- 유니티 스토리
- 유니티 체스
- unity 개발
- 유니티 미연시
- 게임 독학
- unity
- unity 게임 개발
- Today
- Total
하참이의 아이디어노트
Unity 강의 7일차 (3) - 파워업 및 카운트다운 본문
본 강의는 다음 문서를 참고하여 제작하였습니다. 자세한 내용은 하단 링크를 참조하시거나 댓글로 질문 남겨주시면 성심성의껏 답변 드리겠습니다.
4.3강 - 파워업 및 카운트다운 - Unity Learn
개요: 이제 적이 섬에서 플레이어를 추적하지만, 적이 더 추가된다면 플레이어는 더 좋은 방어 수단이 필요합니다. 이 수업에서는 플레이어의 힘을 일시적으로 강화하여 다가오는 적을 밀어내
learn.unity.com
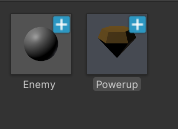
pickups 폴더에는 많은 3D 에셋들이 있습니다. 파워업을 나타낼만한 아이템을 생성해봅시다.
저 같은 경우는 Gem_01을 사용하겠습니다.
해당 에셋을 씬으로 드래그하고 이름을 Powerup으로 변경한 뒤, 스케일과 위치를 수정합니다.

파워업은 충돌 판정 시 획득처리를 해야합니다. 이 경우 어떤 기능을 사용해야 할 지 생각해봅시다.
네. Collider입니다. Box Collider 컴포넌트를 Powerup에 추가하고 Edit Collider 박스를 클릭하여 조절합니다.

조정이 되었다면 충돌시 이벤트 처리를 위해 Is Trigger 체크박스를 선택합니다.
오브젝트의 충돌은 적, 그리고 다양한 아이템이 존재할 것 입니다.
그럴경우 어떤 기능을 사용했는지 생각해봅시다.
네. 태그를 사용해서 충돌한 게임 오브젝트를 구분하였습니다.
Powerup 태그를 생성하고 Powerup에 적용합니다.
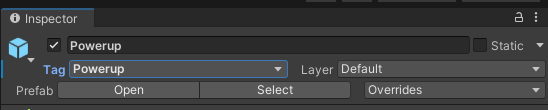
이제 Powerup의 형태가 갖춰졌으니 오리지널 프리팹으로 생성합니다.
이제 충돌시 파워업을 위한 스크립트를 작성합시다.
우선 충돌 시 파워업이 제거되어야겠죠.
PlayerController를 다음과 같이 수정합니다.
using System.Collections;
using System.Collections.Generic;
using UnityEngine;

public class PlayerController : MonoBehaviour
{
    private Rigidbody playerRb;
    public float speed = 5.0f;
    private GameObject focalPoint;
    public bool hasPowerup;

    // Start is called before the first frame update
    void Start()
    {
        playerRb = GetComponent<Rigidbody>();
        focalPoint = GameObject.Find("Focal Point");
    }

    // Update is called once per frame
    void Update()
    {
        float forwardInput = Input.GetAxis("Vertical");
        playerRb.AddForce(focalPoint.transform.forward * speed * forwardInput);
    }

    private void OnTriggerEnter(Collider other)
    {
        if (other.CompareTag("Powerup"))
        {
            hasPowerup = true;
            Destroy(other.gameObject);
        }
    }
}
다른 게임 오브젝트와 충돌 되었을 때 Powerup 태그를 가지고 있다면 hasPowerup 상태로 만들고 해당 오브젝트를 파괴합니다.
이런식으로 태그를 이용하여 파워업을 먹은 상태에서 적과 닿으면 넉백을 시키는 코드를 작성해봅시다.
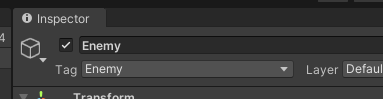
Enemy태그를 생성해 Enemy에게 붙여봅시다.
PlayerController 스크립트를 다음과 같이 수정합니다.
using System.Collections;
using System.Collections.Generic;
using UnityEngine;

public class PlayerController : MonoBehaviour
{
    private Rigidbody playerRb;
    public float speed = 5.0f;
    private GameObject focalPoint;
    public bool hasPowerup;
    private float powerupStrength = 15.0f;

    // Start is called before the first frame update
    void Start()
    {
        playerRb = GetComponent<Rigidbody>();
        focalPoint = GameObject.Find("Focal Point");
    }

    // Update is called once per frame
    void Update()
    {
        float forwardInput = Input.GetAxis("Vertical");
        playerRb.AddForce(focalPoint.transform.forward * speed * forwardInput);
    }

    private void OnTriggerEnter(Collider other)
    {
        if (other.CompareTag("Powerup"))
        {
            hasPowerup = true;
            Destroy(other.gameObject);
        }
    }

    private void OnCollisionEnter(Collision collision)
    {
        if (collision.gameObject.CompareTag("Enemy") && hasPowerup)
        {
            Rigidbody enemyRigidbody = collision.gameObject.GetComponent<Rigidbody>();
            Vector3 awayFromPlayer = (collision.transform.position - transform.position);

            enemyRigidbody.AddForce(awayFromPlayer * powerupStrength, ForceMode.Impulse);
        }
    }
}
powerupStrength를 선언하여 powerup을 먹었을 때 강하게 밀어낼 계수를 선언합니다.
만약 Enemy와 충돌하고, powerUp을 먹은 상태일 경우 적과 player의 위치를 계산하고 Enemy의 Rigidbody에 접근해 Player와 반대 방향으로 밀어버립니다.
이제 PowerUp을 먹었을 때 시간이 지나면 버프가 없어지도록 해봅시다.
이번에는 '코루틴'을 사용 할 것 입니다.
코루틴이 실행되면 코드 진행을 잠시 멈추고 다른 코드에게 차례를 양보한뒤, 일정 시간 뒤에 코드의 진행이 자리로 돌아옵니다.
대부분의 경우 함수를 호출하면 함수의 모든 내용이 완료될 때 까지 함수의 내용만이 진행됩니다. 절차지향에 적합한 상황입니다.
하지만 Unity와 같이 프레임 진행과 코드 진행 과 같이 다양한 작업을 동시에 진행해야 할 경우, 요청이 긴 함수의 진행은 프레임을 멈추거나 다른 코드의 진행이 멈춰지는 등, 게임의 몰입을 방해할 수 있습니다.
그렇기에 사용하는 것이 바로 코루틴입니다.
PlayerController를 다음과 같이 수정합니다.
using System.Collections;
using System.Collections.Generic;
using UnityEngine;

public class PlayerController : MonoBehaviour
{
    private Rigidbody playerRb;
    public float speed = 5.0f;
    private GameObject focalPoint;
    public bool hasPowerup;
    private float powerupStrength = 15.0f;

    // Start is called before the first frame update
    void Start()
    {
        playerRb = GetComponent<Rigidbody>();
        focalPoint = GameObject.Find("Focal Point");
    }

    // Update is called once per frame
    void Update()
    {
        float forwardInput = Input.GetAxis("Vertical");
        playerRb.AddForce(focalPoint.transform.forward * speed * forwardInput);
    }

    private void OnTriggerEnter(Collider other)
    {
        if (other.CompareTag("Powerup"))
        {
            hasPowerup = true;
            Destroy(other.gameObject);
        }
    }

    private void OnCollisionEnter(Collision collision)
    {
        if (collision.gameObject.CompareTag("Enemy") && hasPowerup)
        {
            Rigidbody enemyRigidbody = collision.gameObject.GetComponent<Rigidbody>();
            Vector3 awayFromPlayer = (collision.transform.position - transform.position);

            enemyRigidbody.AddForce(awayFromPlayer * powerupStrength, ForceMode.Impulse);
            StartCoroutine("PowerupCountdownRoutine");
        }
    }

    IEnumerator PowerupCountdownRoutine()
    {
        yield return new WaitForSeconds(7);
        hasPowerup = false;
    }
}
StartCoroutine은 코루틴을 사용할 함수의 문자열을 인자로 받습니다. 이전에 Invoke 함수와 비슷하다고 볼 수 있습니다. 단, 코루틴을 사용하는 함수는 반드시 IEnumerator를 반환하는 형태여야합니다.
그렇게 코루틴으로 함수가 실행되면 yield return을 사용하여 다른 코드에게 Unity 코드진행을 양보할 수 있습니다.
위와 같은 경우에는 7초를 기다리는 함수를 사용함과 동시에 다른 스크립트에게 코드를 양보하였습니다. 즉 7초 동안 다른 스크립트를 수행하고, 돌아와 hasPowerup = false를 수행합니다.
만약 코루틴을 사용하지 않았다면 어떻게 될까요?
7초를 기다리는 동안 다른 함수를 사용하지 못하게 되므로 충돌이 일어났다는 판정 처리도, 움직이라는 명령을 듣는 함수는 커녕 Update 함수조차 갱신되지 못할 것 입니다. 이것이 코루틴의 중요성이죠.
마지막으로 powerup 상태인지를 표시해줄 표시기를 제작해봅시다.
임포트한 패키지의 Powerup Indicators 폴더에는 다양한 powerup의 상태표시 에셋이 존재합니다.
마음에 드는 에셋을 하이어라키뷰로 드래그 한 다음, 이름을 Powerup Indicator로 변경합니다.

처음에는 해당 기능이 표시가 되면 안되므로 인스펙터 창에서 Active를 해제합니다.

PlayerController를 다음과 같이 수정합니다.
using System.Collections;
using System.Collections.Generic;
using UnityEngine;

public class PlayerController : MonoBehaviour
{
    private Rigidbody playerRb;
    public float speed = 5.0f;
    private GameObject focalPoint;
    public bool hasPowerup;
    private float powerupStrength = 15.0f;
    public GameObject powerupIndicator;

    // Start is called before the first frame update
    void Start()
    {
        playerRb = GetComponent<Rigidbody>();
        focalPoint = GameObject.Find("Focal Point");
    }

    // Update is called once per frame
    void Update()
    {
        float forwardInput = Input.GetAxis("Vertical");
        playerRb.AddForce(focalPoint.transform.forward * speed * forwardInput);
        powerupIndicator.transform.position = transform.position + new Vector3 (forwardInput, 0, 0);
    }

    private void OnTriggerEnter(Collider other)
    {
        if (other.CompareTag("Powerup"))
        {
            hasPowerup = true;
            Destroy(other.gameObject);
            powerupIndicator.gameObject.SetActive(true);
        }
    }

    private void OnCollisionEnter(Collision collision)
    {
        if (collision.gameObject.CompareTag("Enemy") && hasPowerup)
        {
            Rigidbody enemyRigidbody = collision.gameObject.GetComponent<Rigidbody>();
            Vector3 awayFromPlayer = (collision.transform.position - transform.position);

            enemyRigidbody.AddForce(awayFromPlayer * powerupStrength, ForceMode.Impulse);
            StartCoroutine("PowerupCountdownRoutine");
        }
    }

    IEnumerator PowerupCountdownRoutine()
    {
        yield return new WaitForSeconds(7);
        hasPowerup = false;
        powerupIndicator.gameObject.SetActive(false);
    }
}
게임 오브젝트 powerupIndicator를 선언합니다.
플레이어가 움직임에 따라 위치를 y -0.5에 위치하도록 합니다.
그리고 Powerup을 먹었을 때, 그리고 시간이 끝났을 때 gameObject.SetActive를 이용하여 활성화, 비활성화를 전환합니다.
좋은데요! 이제 애니메이션의 꽃인 코루틴마저 배웠으니 어디가서 Unity 좀 배웠다고 알랑방구를 뀔 정도는 될 것입니다.
상급 Unity 프로그래머가 될 때까지 킵고잉~
'Unity > Unity 기초' 카테고리의 다른 글
| Unity 강의 8일차 (2) - 점수 기록 (0) | 2025.01.31 |
|---|---|
| Unity 강의 8일차 (1) - UI 마우스 클릭 (0) | 2025.01.31 |
| Unity 강의 7일차 (2) - 플레이어 따라가기 (0) | 2025.01.22 |
| Unity 강의 7일차 (1) - 시점 설정 (0) | 2025.01.22 |
| Unity 강의 6일차 (2) - 플레이어 제어 (0) | 2025.01.21 |


